
In the first part of the tutorial we have seen how to install a LAMP server, and to create a simple web service; now we’ll create an app to connect to the web service.
Xcode – Project – Creating a New Project
We have our web service now, lets start creating our iPad App project in Xcode. Create a Single View App for iPad with Xcode.


Adding Views
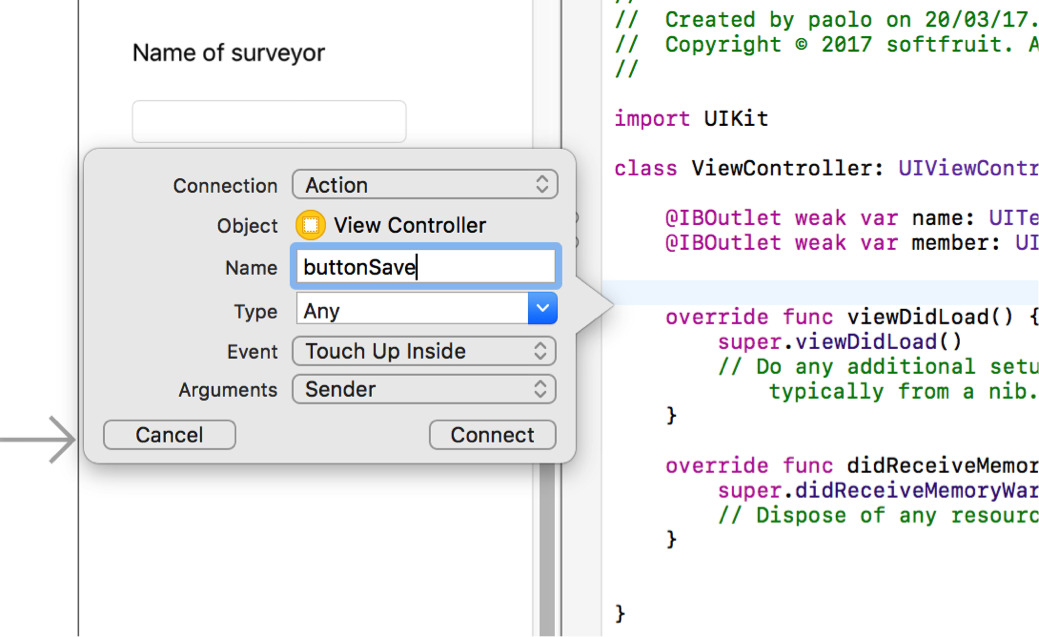
Now go to your Main.storyboard and drag some Text Fields for the fields. We also need to add a Button, at the and of the form, where we will click to save the added values; connect UITextFields to the ViewController, ant the button to an action.


The code for ViewController.swift will be the following.
//
// ViewController.swift
// swiftMariaDB
//
// Created by paolo on 20/03/17.
// Copyright © 2017 softfruit. All rights reserved.
//
import UIKit
import Foundation
class ViewController: UIViewController {
//URL to our web service
let URL_STR: URL = URL(string: "http:///insert your URL here/../CreateRec.php")!
@IBOutlet weak var textfieldUsername: UITextField!
@IBOutlet weak var textfieldWork_id: UITextField!
@IBOutlet weak var textfieldCompl: UITextField!
(....... other fields ....)
@IBOutlet weak var textfieldSurveydate: UITextField!
@IBOutlet weak var textfieldNote: UITextField!
@IBAction func buttonSave(_ sender: Any) {
//creating URLRequest
var request = URLRequest(url: URL_STR)
//setting the method to post
request.httpMethod = "POST"
//getting values from text fields
let username=textfieldUsername.text
let work_id = textfieldWork_id.text
let compl = textfieldCompl.text
(.......)
var surveydate = textfieldSurveydate.text
let note = textfieldNote.text
// convert date for yyyy-MM-dd format
let dateFormatter = DateFormatter()
dateFormatter.dateFormat = "dd/MM/yyyy"
let dateobj = dateFormatter.date(from: surveydate!)
dateFormatter.dateFormat = "yyyy-MM-dd"
surveydate=dateFormatter.string(from: dateobj!)
//creating the post parameter by concatenating the keys and values from text field
let postData = "username="+username+"&work_id="+work_id+" .... (some other fields) "&surveydate="+surveydate+"¬e="+note;
//adding the parameters to request body
request.httpBody = postData.data(using: String.Encoding.utf8)
//creating a task to send the post request
let task = URLSession.shared.dataTask(with: request as URLRequest){
data, response, error in
if error != nil{
print("error is \(error)")
return; }
do {
// If your app communicates with a web application, information returned
// from the server is often formatted as JSON. You can use the Foundation
// framework’s JSONSerialization class to convert JSON into Swift data
// types like Dictionary, Array, String, Number, and Bool.
// JavaScript Object Notation, or JSON for short, is a common way to
// transmit data to and from web services.
let myJSON = try JSONSerialization.jsonObject(with: data!, options: .mutableContainers) as? NSDictionary
if let parseJSON = myJSON {
var messsg: String!
msg = parseJSON["message"] as! String?
print(messsg)
}
} catch {
print(error)
}
}
//executing the task
task.resume()
}
override func viewDidLoad() {
super.viewDidLoad()
// Do any additional setup after loading the view, typically from a nib.
}
override func didReceiveMemoryWarning() {
super.didReceiveMemoryWarning()
// Dispose of any resources that can be recreated.
}
}
With this code we will make a post request to your web service using URLRequest.
Making POST Request to the Web Service
The Button action function will send a POST Request to the URL, using URLRequest.
Now run and test the app in the iPad simulator, inserting values and clicking Save
We got the record inserted message, then view the database table with phpmyadmin.
![]()
You can check that the record has been added successfully.
We have create an iOS app to connect to a database, using HTTP Post method.
All product names, logos, and brands are property of their respective owners